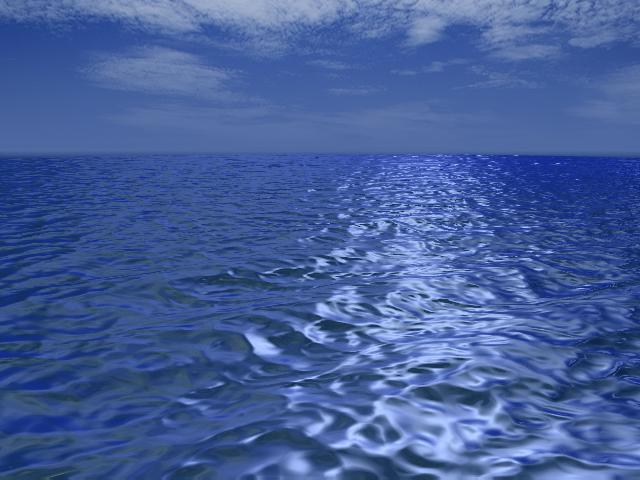
Creating a Sea Environment
This tutorial will teach you how to create a more live sea surface than my other tutorials. I've learned many different ways
to create an ocean mostly by experimenting but this must be the best and easiest one yet.
Remember, you don't have to use the same values as I do. These worked best for me.
|
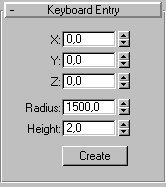
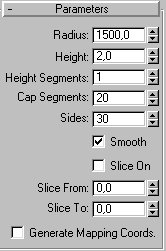
<<< We'll start by creating the ocean. In the
Top-viewport create a cylinder with these values:
In the parameters dropdown change the Cap
Segments to 20 and Sides to 30.>>>
The more segments and sides you add the smoother the waves
will be in the end.
|
|
Create a Ripple Spacewarp at roughly 5 o'clock (980, -1160, 0) (or where ever you want it to be, just remember
that you have to place the camera next to it later). Set the following:
Amplitude1 = 15
Amplitude2 = 15
Wave length = 125
Decay = 0.001
Circles = 20
Segments = 20
Divisions = 15
Animate the Phase as follows:
Frame 0 = 0
Frame 100 = 1,67
And finally bind the spacewarp to the ocean cylinder.
Camera Setup
Create a camera at position (-14, -800, 120) and it's target at (-10, -260, 33) or just put it where you think is best.
Set the environmental Ranges to:
Near Range = 400
Far Range = 1000
Experiment with these values to get the desired effect. If you intend to use fog then increase the values specially the
Far Range value but keep it under the cylinders diameter.
That's all there is to it. You dont need to add a noise modifier or whatever. All that's left now is the material
creation and the lightning setup.
Material Creation
In the first material slot set the Basic parameters as shown here below:
Ambient = (Black, 0, 0, 0)
Diffuse = (Very dark blue, 0, 0, 15)
Shininess = 40
Shin. Strength = 30
Now that we've set the basic stuff let's proceed to the bump mapping. Set the Bump Amount to 20, click on the Bump
Map slot and select Noise. Set the Noise parameters (If you want a matte ocean then use regular noise instead):
Noise type = turbulence
Size = 45
Now we'll animate the noise maps X and Y values. Animate the X and Y at frame 100 to 18.
Animate the Z value at frame 100 to 50.
That takes care of the bump mapping. Now we'll need the ocean to reflect a sky so set the Reflection amount to 50 and click
on the Reflection map slot. Select Bitmap as the Map type and assign Sky.jpg as the bitmap. Set the Coordinates Mapping
to Shrink-wrap Environment. Now apply the material to the Ocean cylinder.
That's all there is to it. You dont need to add a noise modifier or whatever. When it comes to the background you can use
a bitmap in Render/Environment and set it to screen. But use this method only when you're planning not to move the camera.
I've tried a few different ways to create a sky, with a hemisphere, the method above and with a cylinder. The hemisphere
caused the bitmap to stretch so I didn't get that good results. But the bitmap didn't stretch when I used a cylinder.
Download Sky.jpg
Download Sky2.tif
Back to 3D Studio Max Central
(C)opyright
Agron Kabashi
Ken Tran
Steven Truong
http://come.to/pcparadise